Every artist was once an amatuer - Ralph Waldo Emerson.

Saturday, December 25, 2010

A Christmas close to my Hearty

This blog is a shout out to my wonderful friend that I have had the pleasure of knowing for over 20 years.  I'm a full and happy monkey thanks to my closest mate Tegan.  This girl pulled off the incredible today, with the best and most delicious christmas feast I have ever eaten.
I really can't put into words how much this girl means to me.
What a wonderful wonderful day.
 VERY happy.


Animusic - Resonant Chamber

Merry Christmas!  Here is a beautiful animated music video from the incredible folks over at Animusic.
Please go over and enjoy the rest, but for now Please enjoy my favorite right now.

The Resonant Chamber

Thursday, December 23, 2010

Friday, December 10, 2010

Standing Bird


This standing bird would be great in so many projects.  It's very adaptable to textures too.  Make a flock to sit on your mantlepeice!  The tutorial has been provided by Nellies Needles and is available here
Happy Stitching!

Tuesday, December 7, 2010

A new bracelet and earrings

Here is a bracelet I just made with the backs of the snaps fasteners and some more earrings made with just one snap.  I love how the bracelet looks sort of chainmailish. It's closure is another snap facing the other way.  It's quite neat!  I want to buy more of these little beauties maybe in brass and silver.


Cute little mini bloomers


These little mini bloomers are so cute!  The pattern is multi sized from xs to xlarge so you can make the pattern according to your own measurements.  The lovely company Collette Patterns has offered this  Downloadable pattern that is available here.  Happy Stitching!

Sunday, December 5, 2010

Made some new earrings!


Just made some new earrings from some snap fastners.  VERY VERY SIMPLE.  You need some earring hooks some jump rings and some snap fastners.  Some jewellery making pliers help.
I like them very much.  Do you?

I made a Baby Blanket!

I got a call from a good friend the other night that had a baby recently.  Payton was premature and had been staying at the hospital.  With the good news that she was coming home next weekend, I  suddenly decided I was going to make a quilt. I went right to it with materials I had already.  I used some aqua fleece and some quilting scraps for the hearts.  The binding I had was exactly the right amount and I gave mitred corners a go with some sucess!  I've never made a quilt before and I had no batting.  So what I ended up with was more like an applicaed fleece blanket but here it is.  I love it and hope Prue does too.

Saturday, December 4, 2010

Some creative earing ideas.

No tutorial.. just some pictures for inspiration, but they look very easy to work out.  Some basic materials like superglue and jewellery findings and the gorgeous everyday items you want to feature should do you for these projects.
(Although some like the light bulb earrings look like they used a soldering iron.)


 you will need diamond strength jewellery glue for this one


 A soldering iron was used the the creation of these earrings.  I LOVE THEM!


 A small drill piece was used to make the hole in the power buttons


 Diamond strength glue and an earring back is needed for the computer chip earrings.


 A drill piece, small anvil, a mallet and a drill piece designed to drill through silver should be used for the cutlery earrings. 


 The pencil earrings need some some paint (for the eraser end) a awl for the hole and some jewellery findings.
Have fun!

Friday, December 3, 2010

knitted jumper/sweater to skirt and socks set


How's this for a refashion?  You take a old knitted opshop or winter wardrobe find and make a gorgeous skirt and sock set.  A photo tutorial by flickr user Isn't that wild shows you exactly how to do it.  Tutorial here.  Happy Stitching!


full skirt to bubble skirt.


Want a bubble skirt?  I never thought I would, but after seeing some well done example, I thought I might give it a go.  A tutorial at lovemaegan explains how to make a full skirt into a convertible bubble skirt.  (this could even be adapted for any dresses you own or scrounge up from the opshop.)  Handy for mood and whimsy! The tutorial is here.  Happy stitching!

A floppy hat pattern


I was a child of the 80's.  Don't get me wrong I loved hypercolour, rainbow brite and leg warmers... but I dreamed different.  I dreamed of tie die, of maxi dresses and bare feet.  I dreamed of floppy hats.
Wandering around the net the other night I found this.  And had to share.    It's not quite the felt hat of my dreams but it evoked the same feeling.  Our mates at Burdastyle have this pattern in their repository and I am very pleased for it.  All you need for this is a yard of fabric and some fusable interfacing.  Pattern and instructions here.  Happy Stitching!

Thursday, December 2, 2010

Awesome corsage bag


Check out this chic corsage bag that is designed to go on the wrist.  the varying of colours delights me! The folk over at bagntell have offered this tutorial which can be made with:
  • 1 closed zipper, 5 ½” [14 cm] long
  • ½ yd. [0.5 m] of fashion fabric, 45” [115 cm] wide **
  • ¼ yd. [0.25 m] of lining fabric, 45” [115 cm] wide
  • ¼ yd. [0.25 m] of fusible interfacing, 45” [115 cm] wide
  • ¼ yd. [0.25 m] of nylon netting, 18” [45 cm] wide
  • 1 package of piping, ¼ ” [6 mm] wide
  • ⅓ yd. [0.30 m] of belting, 1” [25 mm] wide
  • coordinating thread
  • craft paper 

Or some neckties.... Isn't it just begging to be made from neckties?
anyway the tutorial can be found here
Happy Stitching!

Dino Mittens!


These dino Mittens are adorable and could be made adaptable by using different teeth shapes.  You only need some fleece, some white rubber or felt for the teeth and some buttons. Mme Zsazsa has been generous enough to provide a one page tutorial here. The whole thing will take you about 15 mintues. 
Happy Stitching!

A rant about Australia's "favorite" fabric chain store


First some background information.
 Ruben Fried and his brother Morry Fraid (they say the different surnames was the result of a teacher's spelling mistake during their school years) started out selling fabric at Melbourne's Queen Victoria Market before opening their first store in the suburb of Malvern in 1973.

Over the next three decades the chain expanded quickly, branching out from its haberdashery heritage to become a sort of do-it-yourself destination for craft lovers. Manchester, soft furnishings and party supplies have also been added to the range.

The company has more than 100 stores across Australia, New Zealand and in Singapore and Hong Kong, and annual revenue of around $800 million. Freid and Fraid were valued at $695 million on BRW's Rich 200 list in 2008.

But what this chain has effectively done in such a quick takeover of the craft market is push the smaller stores with the knowledgeable, friendly and unrushed staff out into the cold and out of business.  
Although there is only two of these stores now operating on the gold coast, their presence has greatly reduced the amount of smaller stores that could offer you the personalized help a lot of home sewers need and enjoy.  

Imagine if you will a warehouse full of fabric with plenty of staff wandering about to help you.  You're amazed by the pure size of the building and what looks like masses of choices before you.  Sounds good right?  Ok ok Well as you get closer to the rolls of textiles you realize something is wrong.  There is one or two feature fabrics in each section and then the rest actually looks like filler.
There is rows and rows of horrible garish colours and nothing anything like the colour you need.
And then it happens.. you lower your standards and or have to alter your vision right there in the store. 

You give up on the fabric and take you butt over to the bag making station.  Again they do not have what you need even though a large amount of their customer base makes bags from their quilting stock.  Do they have bag feet?  Do they have bag bottoms?  Nope and nope.  Okay...

Off to get some ribbon and bobbins.   AGAIN with the garish primary colours..no range to speak of.   Dropped my standards again.  Off to get bobbins.  STILL OUT OF STOCK!!!!! WHAT guys! it's been two months! TWO MONTHS! you think just cause there are plenty of janome bobbins on the shelf then people with brother machines can just wait I suppose... I asked and they were like yeah, we don't have any in stock......." like it's a big mystery..They've been saying the same thing for months now.

You start to wonder about the people that make these stock lists.  are they writing them on scrap paper out the back.. do they actually know ANYTHING ABOUT SEWING OR COLOUR???

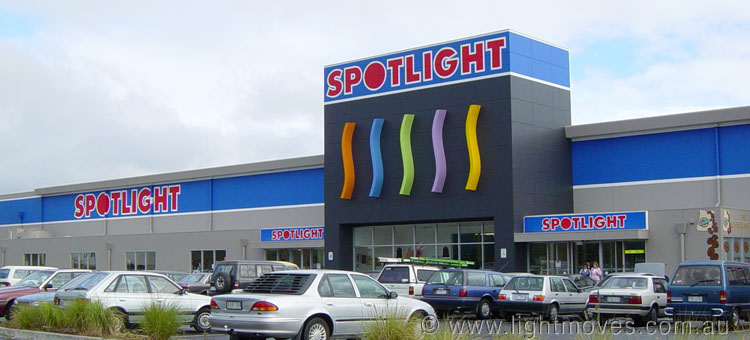
Which brings me to my next point.  Spotlight is not a fabric shop.   Spotlight is a supermarket that happens to sell fabric and craft supplies.  Asking a person working at spotlight for sewing advice is like asking a check out chick for advice about Cooking.  They have no idea. the extent of their training is to cut fabric, retrieve patterns from a filing system and work a register.  You should of seen the woman's face when I asked for some help understanding pattern drafting..She looked at me like I was suggesting she know quantum physics.  It's SO frustrating to get that response..People that owned sewing and fabric stores USUALLY DO SO BECAUSE THEY LOVE TO SEW!!!  These people act like either they have no idea or they couldn't care less.

Sewing is a social craft, a sharing craft a craft for people to discuss and inspire. This mega chain has swallowed everything and still has not the decency to offer the sewing community an adequate service by stocking properly and hiring people that actually have a knowledge base in the goods they are selling.  A lot of hardworking people have lot their livelihoods to them.
They are the people I need to help me. It's sad.


Wednesday, November 24, 2010

Another necktie dress-done and dusted.

I know I should be posting tutorials but I wanted to show you the latest necktie dress that I made.  although from what ive heard around the net, the general consesus is that necktie dresses are novice and base, I sorta like mine, and ive never seen another halter...(bit of defensivness over, here is my second dress.)   The bustline a little lower on this one and the sash twists in the back and ties at the side.  24 ties and one zip went into the making of this dress.


Tuesday, November 9, 2010

Begged Borrowed or Bought

I wanted to share a dress I made for myself from neckties.  Ok so the borrowed ties are not being returned to the owners anytime soon... but anyway..  It's been sitting on the dress form forever because I got zip phobia.. but I have NO IDEA why!
The scariest part was removing it from the dress form as the only thing holding it together at that point was about 300 pins.  But I got it off and sewed the ties together in groups of two and here it is!
22 wide ties and one invisible zip went into the making of this dress.  Getting the ties to cup the breast and not stick out like a wing was hard, but after a lot of ajustments and subtle overlap, it is cupping beautifully with absolutly no wing effect.  Horray!! Ive already got another one in the works. 


Thursday, October 28, 2010

Strawberry drawcord shopping tote


Ok ok this is the pinnacle of cute.  A strawberry bag?  Come on!! Anyway it's adorable!
just tug on the draw cord and it opens up into a standard cloth tote.
I also might be slow (see blog at Ikatbags) but I didn't know how to make these. And now I do!  A lovely gift for a market shopper or a little girl, this tutorial is available from Ikatbags Right here
Happy Stitching!

Starfruit for different occasions.

Do you like this?


 Or this?

As you can see it's the same pattern in varying sizes for different uses!
The pattern is beautiful and very easily adaptable.
It could even be enlarged again and used as...dare I say it..a beanbag?
please go over to Abyquilt for a look at the Pin cushion Tutorial, but I've been looking it over and I think credit for the original design goes to Matching Pegs
Matching Pegs Tutorial available here.  Happy Stitching!

Tuesday, October 19, 2010

Pomegranate Icecream


OK so this is a little out of the usual and I'm not even sure if I should be doing this being that this is a sewing a craft blog, but here you go.
I just love pomegranate SO much I need to add this straight away.  This is a tutorial for Pomegranate icecream. And isn't the picture beautiful? All rights reserved to Cafefenando He suggests you use a icecream machine but leaves links for you to make this recipe using only your freezer.  Yum! Tutorial here. Happy MIXING!

Monday, October 18, 2010

Luscious Bow Tote


Here is a FREE PATTERN from Robert Kaufman!! I can't rave enough about the fabrics over there.  And this bag is very cute.  You need 3/8 of a yard for the body and that again for the side and handles.  1/2 a yard for the bow and 1/2 for the lining. you also need 1/3 of a yard for the pocket.  The PDF instuctions are clear and precice and can be downloaded here.  Happy Stitching!

Simple Serger Sway Back Toddler Dress.


This dress..in this colour, with the sway back??  Guys..seriously.  This is delicious!
Prudent Baby has the tutorial for this gourgeous peice.  All you need is enough stretch jersey (not much perhaps a yard) and a pretty necklace or small peice of chain for the decorative back. 
The website suggests a serger but also notes that one is not needed for this project (just overcast or zigzag the edges.)  As one commenter at the original website noted, the necklace may pose a chocking risk, to remedy this, at the last step of the tutorial, simply thread a loop of chain through the back loops and let it hang in a sway fashion across the base of the neck and a bit below.  Tutorial here  Happy Stitching!

Tuesday, October 12, 2010

Pin Bowl


Here's a gorgeous Pin Bowl from Diary of a Quilter.  I love this idea.  Hit the op shops for a beautiful small bowl.  There are plenty around.  Once you find one all you need is a few super strong magnets and a hot glue gun.  Simply glue a few magnets on the underside of the bowl and you are done! Tutorial here.  Happy Stitching!

Bonsai Pin Cushion


Now...I don't know about you, but my gorgeous boyfriend and son are forever stepping on pins that have rolled off the table and onto the floor.  My INTENTIONS are good but those sharp little suckers always end up EVERYWHERE!  BUT...Look that this! Isn't it amazing?
Laupre has provided this simple but elegant tutorial.
A bonsai pot, a fat quarter and thread is all you need to create this beautiful pin cushion.  I'm going to make a BIG one.   But yours can be any size you want.  Just trace the dimensions of the planter you are going to use (remembering seam allowances!)  Tutorial here.  Happy Stitching!

Monday, October 4, 2010

Lunch Money Cuff Tutorial


Isn't this handy? No more lost tuckshop money!  This tutorial offered by A Lemon Squeezy Home only uses a tiny scrap of fabric, some fusable interfacing, a 3 inch zip and some velcro.  The box zipper instructions are clear and precise.  From preschool too teen in many different fabrics and textures, this is a highly adaptable pattern.
Tutorial here. Happy Stitching!

Sunday, October 3, 2010

Double Wine Bottle Bag


This Tutorial comes from a very very special person and place.  The wonderful creator behind Hashiworks happens to be none other than my incredible fantastic mother!  She has, and always will be, a continued inspiration to me.  Please go visit her blog and try out her stylish double wine bag tutorial.  I love the simple dowel carry handles.  Tutorial in the side bar here.  Happy Stitching!

Pointy Kitty


This tutorial has been posted with someone very special in mind.  Isn't it gorgeous?
Wee Wonderfuls have provided this pattern for free but has asked that no one uses it for commercial use.  How adaptable is it?  Using some inspired fabric choices from your fat quather bin, you could  really go to town.  Personalized your own! pfd pattern and tutorial here.  Happy Stitching!

A finished Muslin of a panic free pattern.

Just wanted to interrupt the tutes for a moment and show you the finished muslin for a pattern I have been thinking about..Just thinking..Giggle.  The photo is not as clear and bright as photos I am accustomed to posting, but the dress makes me feel just that.  Clear and bright. The pattern is Simplicity 2587  that I altered to make sleeveless and then shortened. I love the fact it makes me look a LITTLE taller.  It was fun, and worked out well.  The waistband is comfortable and will look cute in contrasting fabrics.  I am happy to have this pattern continue into my collection..  Now for the bad modeling. 


Thursday, September 30, 2010

Natural Bird Mobile


I LOVE this bird mobile.  The simple beauty of it blows me away. The folks over at Spool Sewing have been generous enough to share it so we can all have one!  All you need is some beautiful fat quarters, fishing line, some hook and eye swivels and some attractive branches.  The pattern is simple and instructions are downloadable from the sidebar in pdf form here.  Happy Stitching!

Fat Quarter Handbag


Here is a link to the etsy shop of a very talented handbag artist.  Her name is Jennifer Ladd and her work is bright and refeshing.  She has shared a fat quarter handbag with Sew Mama Sew and I thought it would be a crime if it was not included.  For this project you will need a fat quarter of fabric in a print you love, a fat quarter of corordinating fabric for the lining, a magnetic closure and some medium grade interfacing and some stylish bag handles.  This is a beautiful project.  Tutorial here.  Happy Stitching!

Chefs Hat


Here is a project for all of your budding chefs in the kitchen.  It's a chefs hat so your child (or you!) can really feel the part.  I do like the coloured example that Curly Pops has pictured but I personally would do one in a basic black or white for a more professional look.  For this project you need either 3 fat quarters (if using patterned fabric) or a little under a yard if doing a plain one.  a little bit of medium grade interfacing for the headband and some velcro or snaps for closure.  The pattern is working with a 56 centimetre head but you adapt it to the circumference of the intended head.  Tutorial here.  Happy Stitching!

Wednesday, September 29, 2010

Teacup Pincushion


Have you ever seen beautiful a lone teacup sitting folornly in a corner of a thrift shop without mates or plates?  Well now you can give that lonely teacup a home and a brand new life as a teacup pincushion! 
A very very simple project from the folks over at mmmcrafts, all you need is a 6 inch circle of coordinating fabric, a bit of poly stuffing, some tread and and a hot glue gun.  and ta da!  Tutorial here.  Happy Stitching!

Cloth Thongs for inside use


Would you like to make some of these?  Lady Harvantine calls them Summer Slippers, but for the sake of this blog lets just call them inside thongs. The fabric she used looks Japanese and I must say they look elegant and refined.  Yes, even for thongs.  All you need a a gorgeous fat quarter, a small amount for fabric for backing, a bit of bias binding or a scrap fabric to make the straps, a bit of polyester batting and enough vinyl to comfortably stand on (you'll be tracing around a set of your thongs onto your vinyl)  A bit of a handful of supplies but trust me these are getting good reviews.  A suggestion is to take these to wear when getting a pedicure insted of wearing the ones the shop supplies, because who wants to wear communal thongs? Ok ok  enough talk.  Tutorial here.  Happy Stitching!

Sunday, September 12, 2010

Baby Booties


The other day while I was posting Tea towel projects I came across these.
Flickr member Bianca Wickers states that they were made with a vintage tea towel.  There was no pattern link so sadly I had to leave them out.  But here it is! Found at Stardust Shoes, These cute little booties can be made with one fat quarter, a scrap of leather and some elastic.  (if you want a stiffer option you can fuse interfacing into the heel and toe areas.) Made to fit babies 6 to nine months.  Or if you like, as a good friend suggested, you could enlarge the pattern and make yourself booties for any age! As an added bonus, here is a link to a Cloth Shoes for Babies Flickr Group.  The example pic above is the work of group member Katherine Meadows.  This group can be used for inspiration, ideas and just plain old showing off.  Pdf tutorial downloadable here.  That's it, off you go!  Happy Stitching!